Have you noticed mysterious gaps appearing between your floorboards in the dead of winter, only to vanish in the humid summer air? Or perhaps you’ve seen a slight upward curve to a plank and worried it was the start of a serious problem. You’re not alone. The constant battle between your home and the changing seasons can wreak havoc on your flooring, turning a beautiful investment into a source of anxiety.
The core problem is that all flooring materials react to their environment. Temperature swings and humidity changes cause them to expand, contract, and move in ways that can lead to buckling, warping, gapping, and permanent damage.
This is your definitive homeowner’s playbook for climate-proofing your floors. We will demystify the science behind why your floors move, provide a visual guide to diagnosing common problems, detail the non-negotiable installation practices that prevent future headaches, and give you a complete four-season strategy for protecting your investment. By the end of this guide, you’ll be empowered to eliminate seasonal anxieties and ensure your floors remain stable and beautiful for years to come.
- The Science of Stability: Why Your Floors Expand and Contract
- Damage Triage: A Visual Guide to Seasonal Flooring Problems
- The Foundation of Stability: Installation Best Practices
- Your Year-Round Floor Maintenance Calendar
- Choosing the Right Floor for Your Climate
- Conclusion: Your Playbook for Lasting Floors
- References
The Science of Stability: Why Your Floors Expand and Contract
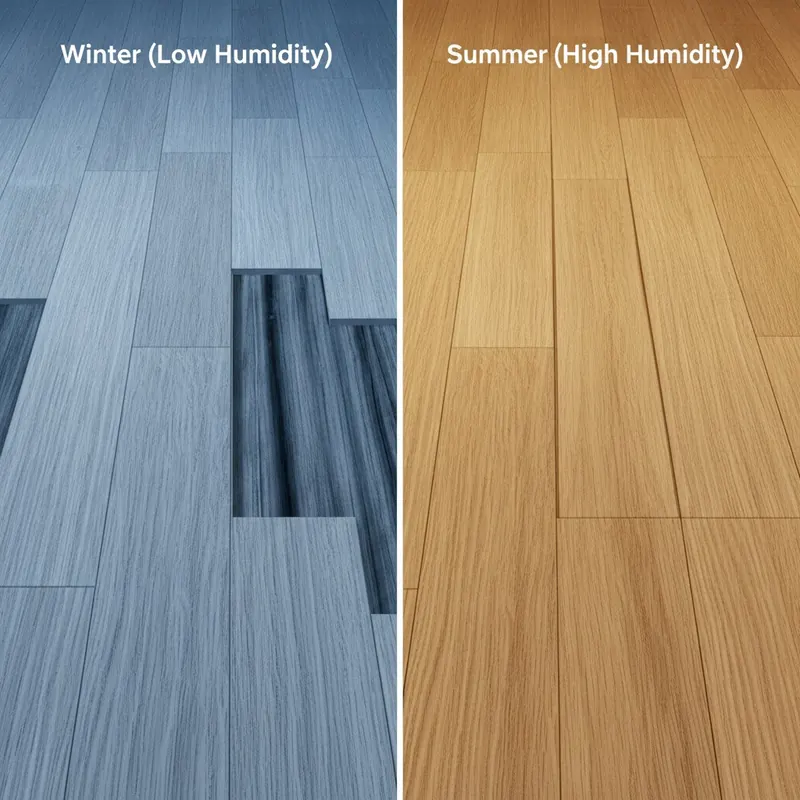
To effectively protect your floors, you first need to understand the powerful natural forces at play. At its core, flooring movement is a simple matter of physics. Materials expand when they gain moisture or heat and contract when they lose them. When this movement is restricted—by walls, cabinets, or even other planks—the pressure builds, leading to visible and often costly damage.
Think of a natural wood or wood-composite plank like a sponge. In a humid environment, it absorbs moisture from the air and swells. In a dry environment, it releases that moisture and shrinks. This is why proper installation is so critical. Without a designated “expansion gap” around the perimeter of the room, the expanding planks have nowhere to go. They push against each other with immense force, causing the floor to lift up in the middle (buckling) or along the seams (peaking).
This isn’t just a wood problem. While wood is highly susceptible to humidity, other materials are more sensitive to temperature. Luxury Vinyl Plank (LVP), for instance, can move by about 1/8 inch for every 10 feet of its length due to thermal expansion.[1] Even the subfloor beneath your feet is part of the equation. Concrete, a seemingly solid and stable material, also expands and contracts with temperature changes. According to research from Penn State’s College of Engineering, the coefficient of thermal expansion for concrete is a measurable force that can impact the entire flooring system above it.[2]
Humidity vs. Temperature: The Two Forces at Play
A common mistake is to treat humidity and temperature as the same issue. While both cause movement, they affect materials differently, and understanding the distinction is key to proper maintenance.
Humidity-Driven Movement: This is the primary cause of seasonal change in porous materials like solid hardwood, engineered wood, and laminate flooring. As VANTIA Hardwoods explains, the cycle is predictable: winter air holds less moisture, and home heating systems dry it out even further. This causes floors to release moisture and shrink, resulting in gaps.[3] Conversely, the high humidity of summer causes these same materials to absorb moisture and expand, which can lead to cupping and buckling.
Temperature-Driven Movement: This is known as thermal expansion and contraction. It affects all materials but is the dominant force in less porous materials like Luxury Vinyl Plank (LVP) and other plastics. Direct sunlight hitting a vinyl floor can raise its temperature dramatically, causing it to expand significantly. When the sun sets and the floor cools, it contracts.
Key Terms to Know:
- Acclimation: The process of letting new flooring sit in the room where it will be installed for a set period (typically 48-72 hours). This allows the material to adjust to the home’s normal temperature and humidity levels before it’s locked into place.
- Hygrometer: An essential tool for any homeowner with wood-based floors. This device measures the relative humidity (RH) inside your home, allowing you to maintain a stable environment.
- Dimensional Stability: A material’s ability to resist changes in its size and shape when exposed to fluctuations in temperature and humidity. A floor with high dimensional stability is less likely to warp, gap, or buckle.
How Different Flooring Materials React
No single flooring material is immune to seasonal changes, but some are far more stable than others.
- Solid Hardwood: The most susceptible to humidity changes. It expands and contracts significantly across the width of the planks, making proper installation and climate control absolutely critical.
- Engineered Hardwood: Far more stable than solid wood. Its cross-layered plywood construction restricts the amount of movement. As experts at Twenty & Oak note, this layered design makes it a superior choice for environments with temperature and humidity swings, including installation over concrete slabs or in basements.[4]
- Laminate Flooring: Composed of a wood-fiber core, laminate is also susceptible to moisture-driven expansion and contraction. It requires a significant expansion gap and careful acclimation.
- Luxury Vinyl Plank (LVP/LVT): Primarily affected by temperature. It is waterproof, so humidity is not a factor in its expansion. However, it requires an expansion gap to accommodate movement from thermal changes, especially in rooms with direct sunlight or significant temperature swings.
- Porcelain & Ceramic Tile: The champions of stability. Fired at extreme temperatures, porcelain tile is incredibly dense and durable. It will not expand or contract with normal changes in household temperature or humidity, making it an ideal choice for challenging environments like sunrooms and bathrooms.
Damage Triage: A Visual Guide to Seasonal Flooring Problems
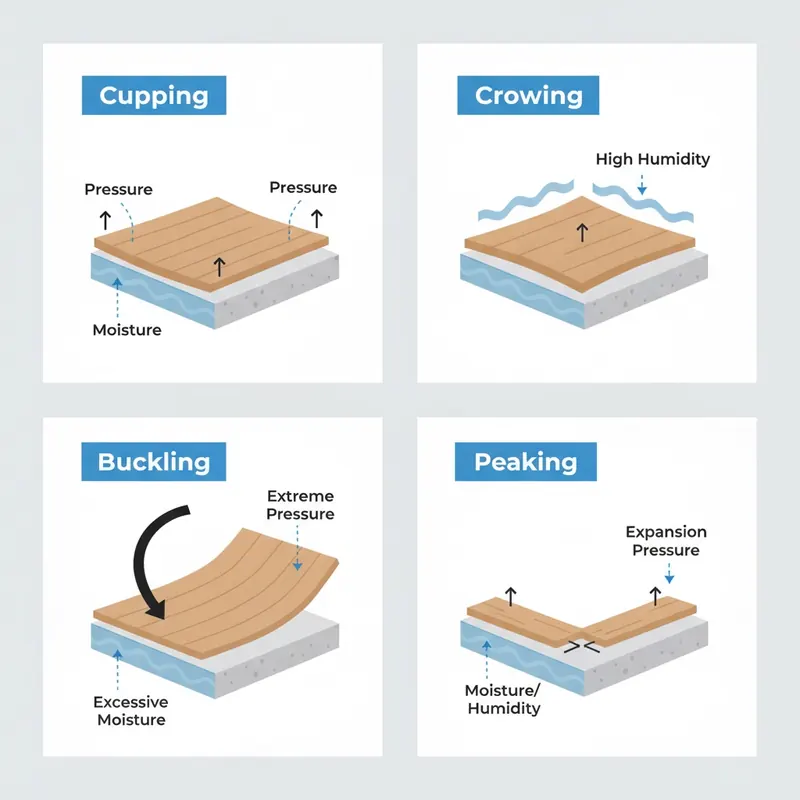
When you see something wrong with your floor, panic can set in. Is it a minor seasonal quirk or a sign of catastrophic failure? This guide will help you diagnose the issue like a pro.
- Cupping:
- What it looks like: The edges of a floorboard are higher than its center, creating a concave, “cupped” shape. You can feel a washboard-like texture when you run your hand across the floor.
- Primary Cause: A moisture imbalance. The bottom of the board is absorbing more moisture than the top, causing the underside to expand and push the edges upward. This is common in summer or over damp basements/crawlspaces.
- DIY vs. Pro: If caught early and the moisture source is eliminated (e.g., running a dehumidifier), the boards may flatten on their own as they dry. If the cupping is severe or persistent, call a professional to diagnose the moisture source and assess the damage.
- Crowning:
- What it looks like: The opposite of cupping. The center of the board is higher than its edges, creating a convex bulge.
- Primary Cause: Often occurs after a floor has been sanded while still cupped. The high edges are sanded down, and when the board finally dries and flattens, the center remains higher. It can also be caused by surface moisture (like a spill left too long).
- DIY vs. Pro: This almost always requires a professional. The floor will likely need to be sanded and refinished by an expert once the moisture content has completely stabilized.
- Buckling:
- What it looks like: The most dramatic form of floor failure. The flooring lifts up several inches from the subfloor, creating a large “tent” or wave.
- Primary Cause: Extreme expansion combined with a lack of space. The planks have pushed against each other and the walls with such force that they have nowhere to go but up. This is usually caused by a major water event (a flood or leak) or a complete lack of an expansion gap during installation.
- DIY vs. Pro: Call a professional immediately. Buckling is a sign of a severe problem that needs expert assessment and repair. The flooring and subfloor must be inspected.
- Peaking:
- What it looks like: A less severe form of buckling where the ends of two planks push against each other and lift slightly at the seam.
- Primary Cause: Insufficient expansion gap. The floor doesn’t have enough room to expand lengthwise.
- DIY vs. Pro: This is a serious warning sign. A professional can sometimes relieve the pressure by creating or expanding the gap at the walls, but the affected planks may need to be replaced.
Summer Swelling: Understanding Cupping, Buckling, and Peaking
The hot, humid air of summer is the prime culprit behind expansion-related floor damage. When the air is thick with moisture, your floors absorb it, leading to swelling. If your home’s indoor humidity level rises too high, you’ll start to see the signs. To prevent these issues, the ideal indoor humidity range is between 30% and 50%.
While seasonal humidity is a major factor, installation errors can make the problem much worse. As the experts at A Step Above Flooring point out, one of the less obvious but critical causes of warping is improper acclimation before installation.[6] If flooring is installed before it has adjusted to the home’s environment, it will undergo significant expansion or contraction after it’s already locked in place, leading to failure.
Winter Shrinkage: Why Gaps Appear Between Floorboards
If summer is the season of swelling, winter is the season of shrinkage. You might notice small but unsightly gaps appearing between your floorboards that weren’t there before. This is a direct result of low humidity.
According to VANTIA Hardwoods, cold winter air naturally holds less moisture. When you turn on your furnace or heating system, it dries the air out even more, pulling moisture from everything in your home—including your floors.[3] As the wood-based planks lose moisture, they shrink in width, creating these gaps.
For a properly installed floor, this is often a normal, temporary process. The gaps will typically close up again as humidity returns in the spring and summer. However, extreme dryness can cause permanent damage, such as cracks in the wood’s surface or splits in the planks.
The Foundation of Stability: Installation Best Practices
The single most effective way to prevent seasonal floor damage is to ensure the floor is installed correctly from the very beginning. An ounce of prevention during installation is worth a pound of cure in costly repairs later.
Installer’s Corner: Pro Tips for a Stable Floor
- Check the Subfloor: Always ensure the subfloor is clean, flat, and dry before starting. Moisture readings are a must, especially on concrete slabs.
- Undercut, Don’t Cut Around: When you reach a door jamb or casing, use a handsaw or oscillating tool to undercut it. This allows the flooring to slide underneath, preserving the expansion gap for a clean, professional look.
- T-Molding is Your Friend: In very large rooms or open-concept floor plans, an intermediate expansion joint covered by a T-molding may be required by the manufacturer. Don’t skip this—it prevents the floor from buckling in the middle of a long run.
The Critical Role of the Expansion Gap
For any “floating” floor installation (where the planks are not glued or nailed to the subfloor), the expansion gap is the most critical element for long-term stability. It is a small, designated space left around the entire perimeter of the room—along walls, around kitchen islands, pipes, and cabinets. This gap acts as a pressure-relief valve, giving the floor room to expand and contract naturally without buckling.
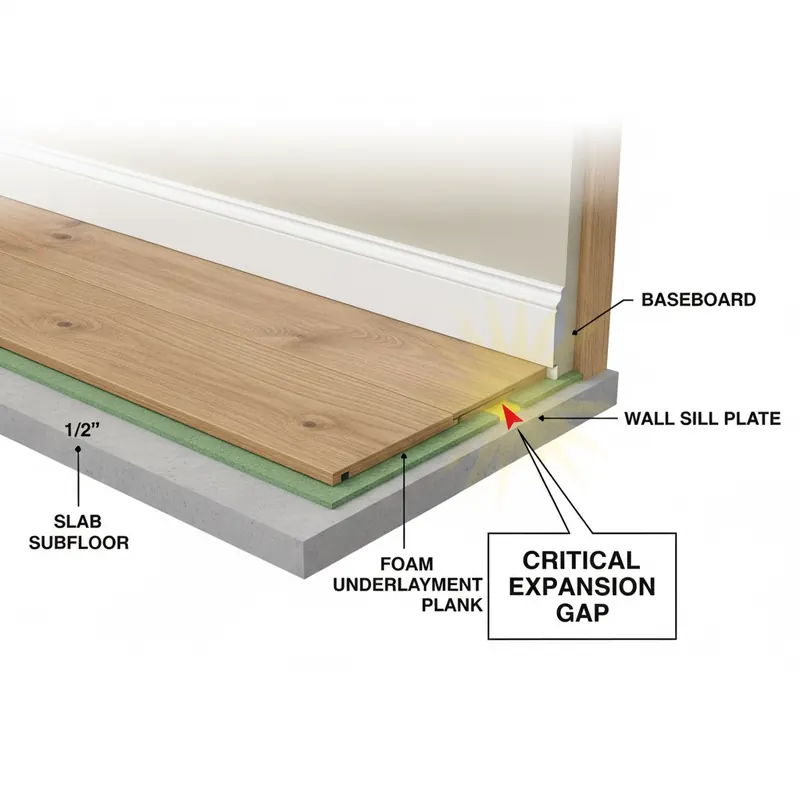
Many homeowners ask, “Do you really need an expansion gap for vinyl plank flooring?” The answer is a definitive yes for all floating LVP installations. While it moves due to temperature rather than humidity, it still moves, and restricting that movement will cause problems.
The size of the required gap varies by material. Here is a general guide based on industry standards:
| Flooring Material | Minimum Required Expansion Gap |
|---|---|
| SPC / Rigid Core LVP | 1/4″ (6 mm) |
| Laminate Flooring | 3/8″ (10 mm) |
| Engineered Hardwood (Floating) | 1/2″ (12 mm) |
*Data sourced from flooring industry experts like BuildDirect.[7]
During installation, small plastic spacers are placed between the first row of planks and the wall to maintain this gap. Once the floor is complete, the spacers are removed, and the gap is completely hidden from view by baseboards or quarter-round molding.
Acclimation: Letting Your Flooring Adjust to Your Home
Skipping the acclimation step is one of the most common and costly installation mistakes. You cannot take flooring from a cold warehouse and install it immediately in a climate-controlled home. The material needs time to reach equilibrium with its new environment.
As highlighted by professional resources like The Carpet Stop, proper acclimation is a best practice for a reason.[8] For example, laminate flooring should be brought into the installation room and left in its packaging for 48 to 72 hours before a single plank is laid.[8] This simple waiting period allows the planks to expand or contract to the room’s typical conditions, ensuring that most of the movement happens before they are locked together.
Addressing a Content Gap: What If My Floor Has No Expansion Gaps?
This is a frustrating discovery for any homeowner. If your floor is buckling or peaking and you realize it was installed tight against the walls, what can you do?
Q&A with a Certified Flooring Installer:
-
Q: I see my floor lifting slightly. How can I confirm the problem is a missing expansion gap?
A: Carefully remove a piece of baseboard or quarter-round molding. If you see the flooring is pressed tight against the drywall or sill plate with no visible space, that’s your problem. The pressure has nowhere to go.
-
Q: Can I fix this myself?
A: It depends on your skill level. The remedy involves creating a gap. This can sometimes be done by using an oscillating multi-tool with a flush-cut blade to carefully trim the edge of the flooring along the wall. This is a dusty, precise job. If you’re not comfortable, it’s best to call a professional.
-
Q: When should I call a pro immediately?
A: If the floor is already severely buckled or if you’re dealing with a valuable material like hardwood, call a professional right away. They have the tools and experience to relieve the pressure, assess if planks can be salvaged, and properly repair the floor. Attempting a DIY fix on a badly damaged floor can often make it worse.
Decision Tree:
- Is the floor showing minor peaking/lifting? → Remove baseboard to check for a gap.
- No gap is present, but damage is minimal. → Consider a DIY fix by trimming the edge if you are skilled, or call a pro for a consultation.
- The floor is significantly buckled or tented. → Stop. Do not walk on it. Call a certified flooring professional immediately.
Your Year-Round Floor Maintenance Calendar
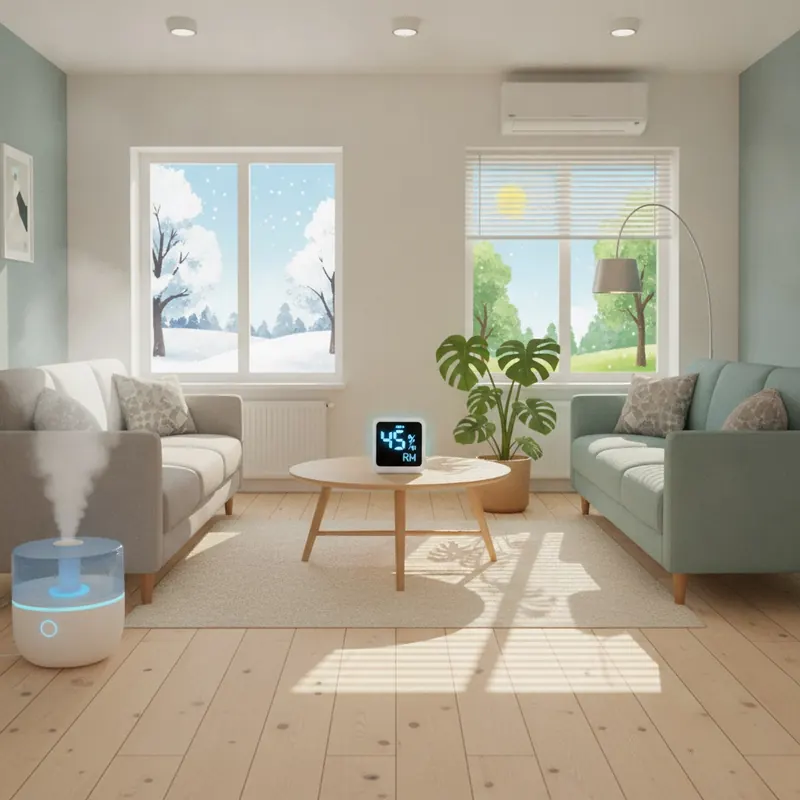
Proper installation is the foundation, but consistent maintenance is what guarantees longevity. Protecting your floors isn’t a one-time task; it’s a year-round commitment to maintaining a stable indoor environment. Following guidelines from authorities like the National Wood Flooring Association (NWFA) on indoor climate control is key.
Winter Checklist: Combatting Dryness
- Monitor Humidity: Place a hygrometer on your main living level. Check it daily.
- Add Moisture: If your home’s relative humidity drops below 35%, use a humidifier. A whole-home humidifier integrated with your HVAC system is the best solution, but portable console units are also effective.
- Protect the Entrance: Use high-quality doormats both outside and inside entryways. This will trap snow, water, and de-icing salt that can damage your floor’s finish and composition.
- Clean Smart: Clean up any water from melted snow or wet boots immediately.
Summer Checklist: Managing Heat and Humidity
- Monitor Humidity: Your hygrometer is just as important in the summer.
- Remove Moisture: If humidity rises above 55%, use your air conditioning system to cool and dry the air. In very humid climates or damp basements, a standalone dehumidifier is essential.
- Block the Sun: Use blinds, drapes, or UV-blocking window film on windows that get intense, direct sunlight. This prevents excessive heat buildup on the floor’s surface, which can cause warping, peaking, and color fading, especially with LVP.
- Check for Leaks: Summer storms can reveal leaks. After heavy rain, check around windows, doors, and in the basement for any signs of water intrusion.
Choosing the Right Floor for Your Climate
If you’re planning a new flooring project, you have the power to choose a material that is naturally suited to your home’s environment. Making the right choice upfront can save you a lifetime of worry.
Flooring Decision Matrix for Climate Stability
| Feature | Porcelain Tile | Engineered Hardwood | Luxury Vinyl Plank (LVP) | Laminate Flooring |
|---|---|---|---|---|
| Dimensional Stability | Excellent | Very Good | Good (Temp Sensitive) | Fair (Humidity Sensitive) |
| Best For… | Extreme temp/humidity swings, sunrooms, bathrooms, basements | All levels of the home, variable climates | Basements, kitchens, areas with temperature swings | Climate-controlled areas, budget-conscious projects |
| Key Weakness | Hard/cold underfoot, difficult installation | Can be damaged by standing water | Can peak/warp from direct sunlight/heat | Easily damaged by moisture, can feel hollow |
Top Choices for Residential Homes with Climate Swings
For most homes that experience distinct seasons, finding a balance between beauty and stability is key.
- Engineered Hardwood: As previously mentioned, the cross-ply construction of engineered hardwood makes it significantly more stable than its solid counterpart, making it an excellent choice for almost any room in the house.[4] It offers the authentic beauty of wood without the extreme sensitivity to humidity changes.
- Luxury Vinyl Plank (LVP): LVP’s waterproof nature makes it a fantastic choice for potentially damp areas like basements, kitchens, and bathrooms. Its main vulnerability is heat, so it’s important to choose a high-quality product and follow installation guidelines carefully in sun-drenched rooms.
Scenario-Based Recommendations:
- Best for a Sunroom or Three-Season Porch: Porcelain Tile. It is completely unfazed by extreme temperature swings and direct sunlight.
- Best for a Basement: Luxury Vinyl Plank (LVP) or Porcelain Tile. Both are waterproof and will not be damaged by the higher humidity common in below-grade spaces.
- Best for a Second-Floor Bedroom: Engineered Hardwood or Laminate. These areas are typically more climate-controlled, making these materials safe and cost-effective choices.
High-Performance Options for Extreme Temperatures
In some residential areas (like garages) or commercial settings, floors are subjected to thermal shock—a sudden, rapid change in temperature, like spilling boiling water or moving a hot vehicle onto a cold slab. This can cause standard flooring to crack, bubble, or delaminate.
For these demanding environments, specialized systems are required. According to industrial coating authorities like Sherwin-Williams, high-performance flooring like urethane cement is engineered to handle these extremes. These systems can typically withstand temperature fluctuations of over 200°F without failing, making them ideal for commercial kitchens, breweries, and heavy-duty garages.[9]
Conclusion: Your Playbook for Lasting Floors
Your floors are one of the largest and most important investments in your home. As we’ve seen, protecting that investment from the relentless cycle of seasonal change comes down to a three-part strategy:
- Understand the Science: Know that your floors will naturally expand and contract with changes in humidity and temperature.
- Insist on Proper Installation: A correct acclimation period and a properly executed expansion gap are the non-negotiable foundations of a stable, long-lasting floor.
- Practice Proactive Maintenance: Use a year-round calendar to manage your home’s indoor climate, keeping humidity levels consistent and protecting your floors from the extremes of winter and summer.
You are now empowered with a complete playbook. By understanding the forces at play, diagnosing problems correctly, and committing to a simple maintenance routine, you can eliminate seasonal anxiety and ensure your floors remain a source of pride and beauty for their entire lifespan.
Download your free ‘Seasonal Floor Maintenance Checklist’ to stay on track all year long. Have a question or a success story? Share it in the comments below!
The information provided is for educational purposes. For specific installations, repairs, or significant damage, always consult a certified flooring professional. Follow all manufacturer guidelines for your specific flooring product.
References
- Clouds Flooring. (n.d.). How To Ensure Stability With Luxury Vinyl Plank Movement. Retrieved from https://www.cloudsflooring.com/how-to-ensure-stability-with-luxury-vinyl-plank-movement
- Penn State College of Engineering. (n.d.). Thermal Expansion and Contraction. Retrieved from https://www.engr.psu.edu/ce/courses/ce584/concrete/library/cracking/thermalexpansioncontraction/thermalexpcontr.htm
- VANTIA Hardwoods. (n.d.). How to Manage the Impact of Humidity and Temperature on Hardwood Floors. Retrieved from https://www.vantiahardwoods.com/hardwood-flooring-blog/how-to-manage-the-impact-of-humidity-and-temperature-on-hardwood-floors
- Twenty & Oak. (n.d.). Winter Flooring: 4 of the Warmest Floors for Your Home. Retrieved from https://twentyandoak.com/inspiration/trends-and-styles/winter-flooring-4-of-the-warmest-floors-for-your-home
- Topnotch Flooring America. (n.d.). What Does It Mean If My Hardwood Floors Are Warping?. Retrieved from https://www.topnotchflooringamerica.com/custom/mf1787/blog-article-5
- A Step Above Flooring. (n.d.). What Does It Mean If My Hardwood Floors Are Warping?. Retrieved from https://www.astepabovefloors.com/blog/what-does-it-mean-if-my-hardwood-floors-are-warping
- BuildDirect. (n.d.). The Right Expansion Gaps for Every Flooring Type. Retrieved from https://www.builddirect.com/blogs/pro-flooring-installers/the-right-expansion-gaps-for-every-flooring-type
- The Carpet Stop. (n.d.). Why Laminate Flooring Needs Expansion Gaps and What Happens Without Them. Retrieved from https://www.carpetstop.com/why-laminate-flooring-needs-expansion-gaps-and-what-happens-without-them
- Sherwin-Williams Industrial. (n.d.). Thermal Shock Resistant Epoxy Floor Coatings & Systems. Retrieved from https://industrial.sherwin-williams.com/na/us/en/resin-flooring/media-center/articles/industrial-flooring-requirements/thermal-shock-resistant-epoxy-floor-coatings-systems.html