Hardwood floors are more than just a surface to walk on; they are a timeless investment that adds warmth, character, and significant value to your home. But with this investment comes a set of anxieties familiar to every homeowner: the heart-stopping moment of a spilled drink, the confusion of choosing the right protective coating from a sea of options, and the uncertainty of how to handle the inevitable scuffs and wear of a well-lived life.
This is your ultimate hardwood floor owner’s manual. We’ve created a comprehensive, lifecycle guide to empower you to protect, repair, and restore your investment with confidence. We will cut through the marketing jargon and conflicting advice to give you clear, actionable strategies. Together, we will explore how to choose the right proactive protection for your floors, demystify the fine print of product warranties, create an emergency action plan for water damage, and make smart, cost-effective restoration decisions when the time comes.
- Proactive Protection: Choosing the Right Armor for Your Floors
- The 10-Year Warranty Promise: What You MUST Know
- Emergency First-Aid: Your Action Plan for Wood Floor Splash Damage
- Restoring Worn Wood Flooring: Recoat or Refinish?
- Your Floors, Protected for a Lifetime
- References
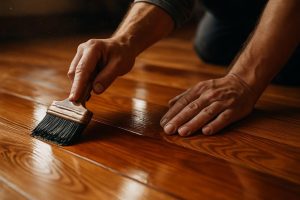
Proactive Protection: Choosing the Right Armor for Your Floors
The best defense for your hardwood floors is a great offense. This begins with understanding the foundational elements of wood floor protection, starting with the crucial difference between “water-resistant” and “waterproof” and then diving into a detailed comparison of the most effective protective coatings available. Making an informed choice here is the single most important step you can take to ensure the longevity and beauty of your floors.
Water-Resistant vs. Waterproof: Setting Realistic Expectations
One of the most common points of confusion for homeowners is the distinction between water-resistant and waterproof finishes. It’s a critical difference that sets realistic expectations for your floor’s durability.
In practice, almost no finish can make a natural, solid hardwood floor truly waterproof. Wood is a natural, hygroscopic material, meaning it absorbs and releases moisture from its environment. As flooring experts at Vermont Plank Flooring explain, a truly waterproof barrier would need to completely encapsulate every side of every board, which is impossible for a floor installed in a home[1].

Instead, high-quality wood floor finishes provide water resistance. This means the surface is sealed to prevent liquids from penetrating the wood for a limited period. A water-resistant finish gives you a crucial window of time—minutes to hours, depending on the product—to clean up spills before they can seep into the wood grain and cause staining, warping, or other damage. Understanding this distinction is key: your finish is your first line of defense, not an invincible shield.
The Best Protective Coatings for Wood Flooring: A Comparative Guide
Choosing a protective coating can feel overwhelming, but breaking it down by category helps clarify which option is best for your lifestyle, budget, and aesthetic preferences. Here is a comparative guide to the top choices on the market, designed to help you overcome analysis paralysis.
| Finish Type | Durability | Appearance | VOCs/Odor | DIY-Friendliness | Key Feature |
|---|---|---|---|---|---|
| Polyurethane (Oil) | Very High | Adds a warm, amber hue. | High | Moderate | Classic durability and rich color. |
| Polyurethane (Water) | High | Clear, non-yellowing. | Low | High | Fast drying and low odor. |
| Polyaspartic | Exceptional | High-gloss, clear finish. | Low-Varies | Low (Pro Only) | Commercial-grade abrasion resistance. |
| Hard Wax Oil | Moderate | Matte, natural wood feel. | Very Low | High | Easy to spot-repair. |
| Aluminum Oxide | Extreme | Varies; factory-applied. | N/A (Pre-finished) | N/A (Pre-finished) | The longest-lasting finish available. |
Polyurethane (Water-Based & Oil-Based): The Versatile Industry Standard
Polyurethane is the most common site-applied finish for hardwood floors, forming a durable plastic-like layer on the wood’s surface.
- Oil-Based Polyurethane is known for its exceptional durability and its tendency to impart a rich, warm amber glow to the wood over time. It has a higher level of Volatile Organic Compounds (VOCs), a strong odor, and takes longer to cure.
- Water-Based Polyurethane is a popular modern alternative with low VOCs, minimal odor, and a much faster drying time. It provides a clear, non-yellowing finish that preserves the natural color of the wood. According to the National Wood Flooring Association (NWFA), proper maintenance with approved cleaning products is crucial to preserving the life of any polyurethane finish[2].
Polyaspartic Coatings: The Commercial-Grade Durability Champion
If you’re looking for the absolute peak of durability, polyaspartic coatings are a top contender. Originally developed for industrial applications like coating steel bridges, this technology offers incredible abrasion and chemical resistance. When asked what is more durable, polyaspartic or epoxy, the answer is clear. According to specialized installers at Garage Living, a high-quality polyaspartic coating can be approximately four times stronger and more abrasion-resistant than standard epoxy coatings[3]. This level of performance comes at a higher cost and requires professional installation due to its extremely fast cure time.
Hard Wax Oil: The Natural, Spot-Repairable Finish
Unlike surface coatings that form a film, hard wax oils are penetrating finishes that soak into the wood grain, hardening to form a protective seal from within. This preserves the natural texture and feel of the wood. Their biggest advantage is repairability. If you get a scratch or scuff, you can spot-repair the affected area without needing to sand and refinish the entire floor. For homeowners concerned about indoor air quality, many hard wax oils are a great choice. Independent testing from sources like My Chemical-Free House often highlights these finishes for their zero or ultra-low VOC content, making them a healthier option for the home[4].
Aluminum Oxide: The Ultra-Durable Factory Finish
Aluminum oxide is a naturally occurring mineral that, when added to a finish, creates one of the most durable surfaces available for wood flooring. This is not a finish you can apply yourself; it is a factory-applied coating used on pre-finished flooring planks. The finish is cured under UV lights for an instant, hardened seal that is exceptionally resistant to scratches and wear. Because of this robust factory application, aluminum oxide finishes can have a lifespan of up to 25 years before showing significant wear, making them a premier choice for long lasting wood protection.
Beyond the Finish: A Multi-Layered Defense Strategy
True wood floor protection extends beyond the top coat. A holistic, multi-layered defense strategy is the best way to prevent damage from all angles.

- Moisture Barrier Underlayment: This is a critical component, especially for installations on or below grade (e.g., in a basement) or over a concrete subfloor. A moisture barrier is a thin sheet of plastic or specialized material installed between the subfloor and the hardwood. It prevents ambient moisture from the ground or concrete from wicking up into the wood, which is a primary cause of cupping and warping.
- Humidity Control: Wood expands and contracts with changes in humidity. Maintaining a stable indoor environment is crucial for your floor’s health. Experts recommend keeping the optimal indoor relative humidity between 45-55% to minimize this movement and prevent gaps from forming in winter or buckling in summer.
- Proactive Habits: Simple daily habits provide powerful protection. Use doormats at all entrances to trap grit and moisture. Place trays under pet water bowls to catch splashes. Apply felt pads to the bottom of all furniture to prevent scratches.
The 10-Year Warranty Promise: What You MUST Know
A long-term warranty can offer incredible peace of mind, but it’s only valuable if you understand what it covers and what is required of you. Many homeowners are surprised to find that their 10-year or even 30-year finish warranty has been voided by simple, preventable mistakes.
Decoding the Fine Print: What Voids Your Floor’s Warranty?
Manufacturers’ warranties are designed to protect against product defects, not against damage from improper installation, maintenance, or environmental conditions. According to the flooring experts at Wagner Meters, one of the most common reasons for warranty claim denial is excess moisture, which is almost always considered an environmental issue outside the manufacturer’s control[5].
Here are the most common actions that can void your floor’s warranty:

- Improper Application: Many high-performance finishes, like those from Bona, require application by a certified professional who follows a specific process. For instance, Gorsegner Brothers Hardwood Flooring notes that some Bona warranties are only valid if their specified “4 Coat System” is used, a detail a DIYer might easily miss[6].
- Using Unapproved Cleaners: Warranty documents from manufacturers like Provenza Floors explicitly state that damage caused by non-approved cleaning products—including oil soaps, wax-based cleaners, or steam mops—is not covered[7]. Always use the manufacturer’s recommended cleaning system.
- Ignoring Environmental Controls: Failure to maintain the required ambient humidity levels (typically 35-55%) can void the warranty.
- Confusing Wear with Damage: A common question is, “Does gloss reduction count as wear-through under a warranty?” The answer is almost always no. Warranties typically cover “wear-through,” meaning the finish has completely worn away to expose the bare wood. A reduction in sheen or the appearance of fine surface scratches is considered normal wear and is not covered.
Your Maintenance Checklist to Keep Your Warranty Valid
To ensure your warranty remains intact, treat it like a partnership. The manufacturer provides the product, and you provide the proper care.
- Keep Your Receipts: Save the proof of purchase for your flooring and any professional installation invoices.
- Use Only Manufacturer-Approved Cleaners: Purchase the recommended cleaning solution and microfiber mop. Avoid all-purpose cleaners, vinegar, and water, or steam cleaners.
- Document Humidity Levels: Consider using a simple hygrometer to monitor indoor humidity, especially during seasonal changes.
- Address Spills Immediately: Wipe up all spills as soon as they happen. Do not let water or other liquids sit on the floor.
- Protect from Scratches: Use felt pads on furniture, keep pet nails trimmed, and avoid walking on floors with high heels or cleats.
- Read the Warranty Document: Take 15 minutes to read the full document. Pay close attention to the “Exclusions” section.
If you believe your finish is failing due to a product defect, the claim process typically involves contacting the retailer where you purchased the flooring. They will initiate a claim with the manufacturer, which will likely involve a site inspection by a certified flooring inspector to determine the cause of the failure.
Emergency First-Aid: Your Action Plan for Wood Floor Splash Damage
Even with the best protection, accidents happen. When you’re faced with wood floor splash damage, a fast and correct response can make the difference between a minor cleanup and a major repair. Think of this as an emergency first-aid guide for your floors.
Immediate Steps for Water Spills (The First 30 Minutes)
Time is your enemy. Act quickly and methodically.

- Stop the Source: Immediately identify and stop the source of the water.
- Contain the Spill: Use towels to create a dam around the spill to prevent it from spreading further.
- Remove Surface Water: Use dry, absorbent towels to blot the water up. Blot, don’t wipe, as wiping can push water into the seams between boards.
- Use a Wet-Vac (If Available): For larger spills, a wet-dry vacuum is the most effective tool for pulling water out from the edges and seams of the planks.
- Promote Air Circulation: Open windows and use fans to create airflow across the affected area to aid in drying.
What NOT to Do: A common mistake that can cause more harm is applying direct, high heat. Do not use a hairdryer or space heater aimed directly at the wet spot. This can cause the wood to dry too quickly and unevenly, leading to permanent cracking and warping. Gentle, consistent air circulation is the safest method.
Damage Assessment Guide: Is it a DIY Fix or Time to Call a Pro?
After the initial cleanup, you need to assess the damage. For minor spills caught quickly, drying the area may be all that’s needed. But if water has sat for a while or the spill was significant, you may see changes in the wood. According to water damage restoration specialists like SERVPRO, it’s crucial to identify these signs early to prevent long-term issues like mold growth[8].
Here’s how to diagnose the problem:
- Cupping: The edges of the wood planks are higher than the center, creating a concave shape. As flooring repair experts at Totta Hardwoods explain, this almost always means there is a moisture imbalance—the bottom of the board is wetter than the top, often from moisture coming from the subfloor[9]. This requires professional assessment.
- Crowning: The opposite of cupping. The center of the board is bowed up higher than the edges. This typically happens when the surface of the board has been exposed to more moisture than the bottom, or as a result of a previous cupping issue being sanded flat before the board was fully dry.
- Buckling: This is the most severe form of water damage, where the flooring pulls away from the subfloor entirely, sometimes lifting several inches. This is a flooring emergency and requires immediate professional intervention.
If you see any signs of cupping, crowning, or buckling, or if you notice a musty odor (a sign of mold), it’s time to call a certified professional. They have the moisture meters and expertise to determine the extent of the damage and recommend the proper course of action.
Restoring Worn Wood Flooring: Recoat or Refinish?
Over years of use, even the most durable finish will begin to show its age. When your floors look dull, scuffed, or lightly scratched, you have two primary restoration options: recoating or refinishing. Choosing the right one can save you significant time and money.
The Diagnostic Test: How to Tell if Your Floor Can Be Recoated
Recoating (also called screening and coating) involves lightly abrading the existing finish and applying a new top coat. It’s faster, cheaper, and less disruptive than a full refinish. But it only works if your existing finish is worn but still intact.
Here’s a simple diagnostic test you can do yourself:
- Go to a high-traffic area of your floor.
- Pour a single drop of water, about the size of a quarter, onto the floor.
- Watch the drop. If the water beads up and sits on the surface, your finish is still intact, and the floor is likely a great candidate for recoating.
- If the water slowly soaks into the wood, creating a dark spot, or if it causes the finish to turn white or cloudy, the protective seal is broken. The water is penetrating to the bare wood, and the floor will need to be fully refinished.
Recoating vs. Refinishing: A Head-to-Head Comparison
Understanding the key differences between these two processes is essential for making the right decision. Major flooring manufacturers like Bruce provide clear guidance on when each method is appropriate for their products[10].
| Feature | Recoating (Screen & Coat) | Refinishing (Sand & Finish) |
|---|---|---|
| Best For | Dull finish, light surface scratches, worn high-traffic areas. | Deep scratches, gouges, stains, graying/oxidized wood, changing the color. |
| Process | The existing finish is lightly abraded (screened) to create a bond, then a new coat of finish is applied. | The old finish and a thin layer of wood are sanded off down to bare wood. Stain (optional) and multiple new coats of finish are applied. |
| Time | Typically 1 day. | Typically 3-5 days (including drying/curing time). |
| Cost | Low to moderate. | High (often 3-4 times the cost of recoating). |
| DIY-Friendly? | Yes, for experienced DIYers. | No, requires professional equipment and expertise. |
Ultimately, recoating is a maintenance procedure, while refinishing is a major restoration. As a rule of thumb, the National Wood Flooring Association (NWFA) suggests that a recoat can be performed every 3-5 years to keep floors looking fresh, while a full refinishing is only necessary when there is significant damage or wear-through[2].
Your Floors, Protected for a Lifetime
Your hardwood floors are a foundational element of your home’s beauty and value. By moving from uncertainty to empowered ownership, you can protect that investment for decades. We’ve shown that the key lies in a three-part strategy: choosing the right proactive protection and understanding its limits; knowing the fine print of your warranty and how to maintain it; and having a clear, confident action plan for both minor emergencies and long-term restoration. With this knowledge, you are no longer just a homeowner—you are the expert caretaker of your floors, equipped to preserve their elegance for years to come.
Ready to give your floors the ultimate, long-lasting protection you’ve learned about? Explore Adamantine Protective Wood Coating and see how its durable, water-resistant finish and 10-year warranty can provide the peace of mind your home deserves.
*This article provides general advice. For significant water damage, complex finish applications, or warranty claims, consult with a certified flooring professional. Product mentions are based on independent research and are not official endorsements.*
References
- Vermont Plank Flooring. (n.d.). How to Protect Your Hardwood Flooring from Water Damage. Retrieved from https://vermontplankflooring.com/blog/protect-hardwood-flooring-from-water-damage/
- National Wood Flooring Association (NWFA). (n.d.). Maintenance. Retrieved from https://woodfloors.org/maintenance/
- Garage Living. (n.d.). Polyaspartic vs. Epoxy Floor Coatings: A Detailed Comparison. Retrieved from https://www.garageliving.com/blog/polyaspartic-vs-epoxy-comparison
- My Chemical-Free House. (2020). Non-Toxic Wood Finishes (I Tested Them All). Retrieved from https://www.mychemicalfreehouse.net/2020/10/non-toxic-wood-finishes-i-tested-them-all.html
- Wagner Meters. (n.d.). Hardwood Floor Warranties: What You Don’t Know Can Cost You. Retrieved from https://www.wagnermeters.com/moisture-meters/wood-info/hardwood-floor-warranties/
- Gorsegner Brothers Hardwood Floors. (n.d.). Gorsegner Brothers is a Bona Certified Craftsman offering a 10 Year Warranty on the Bona Mega Finish. Retrieved from https://www.gorsegnerbrothers.com/bona-mega-10-year-warranty/
- Provenza Floors, Inc. (n.d.). Hardwood Flooring Limited Warranty Guide. Retrieved from https://www.provenzafloors.com/resources/hardwoodguide
- SERVPRO. (n.d.). Repairing Water Damaged Hardwood Floors. Retrieved from https://www.servpro.com/resources/water-damage/repairing-water-damage-hardwood-floor
- Totta Hardwoods. (n.d.). Repairing a Water Damaged Hardwood Floor. Retrieved from https://tottahardwoods.com/repairing-a-water-damaged-hardwood-floor/
- Bruce. (n.d.). The Ultimate Guide to Hardwood Floor Care. Retrieved from https://www.bruce.com/en-us/the-ultimate-guide-to-hardwood-floor-care.html