Introduction
Choosing a hardwood floor finish can feel confusing—especially when advice conflicts, timelines are tight, and you can’t risk a failure. This guide cuts through the noise with a systems-based, NWFA-aligned approach that pairs your wood species, stain color, traffic level, and timeline tolerance with the right sealer + polyurethane floor coating. You’ll get clear comparisons (water-based vs oil-based vs 2K waterborne), a pro-grade application blueprint, smart ways to maximize water resistance, solutions for scratches and traffic-lane wear, and transparent DIY vs pro costs and timelines. Expect practical decision trees, compatibility notes, and maintenance plans you can use immediately.
- Introduction
- Why Choose a Polyurethane Floor Coating for Wood Floors
- Water-Based vs Oil-Based Polyurethane (Plus 2K Waterborne): Which Hardwood Floor Finish Is Best?
- Do You Need a Wood Floor Sealer Before Polyurethane?
- Choose the Right System: Decision Framework by Species, Stain, Traffic, and Timeline
-
How to Apply Polyurethane to Wood Floors: A Pro-Grade Step-by-Step
- Room Prep and Sanding Sequence
- Stir, Don’t Shake: Product Prep
- Choose the Right Applicator: T-Bar, Roller, or Pad
- Edges and Field Technique: Avoiding Lap Lines and Bubbles
- Coat Counts, Intercoat Abrasion, and Recoat Windows
- Dry, Re-Entry, and Full Cure Timeline
- Troubleshooting: Bubbles, Dust Nibs, Lap Lines, and Adhesion
- Maximize Water Resistance and Day-to-Day Care
- Solve Common Problems: Scratches, Traffic-Lane Wear, and Water Damage
- Best Polyurethane for Hardwood Floors: Brand‑Neutral Criteria and Use‑Case Picks
- DIY vs Professional Polyurethane Floor Refinishing
-
FAQs About Polyurethane Floor Coatings
- What is a polyurethane floor coating and how does it protect wood?
- What’s the difference between water-based and oil-based polyurethane?
- How many coats of polyurethane are best for floors?
- How long does polyurethane last on hardwood floors?
- Can I apply polyurethane over an existing finish without sanding?
- Is water-based polyurethane as durable as oil-based?
- Are water-based finishes water-resistant enough for kitchens?
- Tools, Calculators, and Downloads
- Conclusion
- Disclaimer
- References
Why Choose a Polyurethane Floor Coating for Wood Floors
A polyurethane floor coating is a film-forming hardwood floor finish that creates a durable, protective barrier over the wood. Properly built and maintained, it shields against abrasion, everyday spills, and routine wear in high-traffic areas far better than penetrating oils or wax. Industry standards and best practices from organizations like the National Wood Flooring Association (NWFA) help define how film-forming finishes protect the wood, while wear-resistance is often compared using standardized abrasion tests such as ASTM D4060 (Taber abrasion). Leading manufacturers publish Technical Data Sheets (TDS) that specify recommended coat counts, recoat windows, and cure timelines that determine how tough—and how quickly—your finish system reaches full performance [3][4].
What Polyurethane Does: A Clear, Durable Film that Shields Wood
Polyurethane is a film-forming hardwood floor finish. Once applied, it:
- Seals the wood’s pores and reduces liquid penetration, improving water resistance.
- Builds a wear layer that resists abrasion from foot traffic, grit, and chair movement.
- Provides sheen options (matte to gloss) that affect appearance and scratch camouflage.
- Enables maintenance pathways such as screen-and-recoat, extending floor life without a full resand.
NWFA guidance emphasizes film build (how thick the protective layer is) and proper coat counts to reach the performance the product is designed to deliver. Manufacturer TDS for floor-rated polyurethane products detail:
- Recommended coat counts by system (e.g., 1 sealer + 2–3 topcoats for waterborne; typically 3 coats for oil-based).
- Coverage rates and target film thickness per coat.
- Recoat windows and intercoat abrasion requirements for adhesion [3][4].
Polyurethane vs Other Hardwood Floor Finishes
Compared with penetrating oils, acid-cure finishes, or wax:
- Polyurethane creates a tougher, more serviceable wear layer with predictable maintenance (screen-and-recoat before bare wood shows).
- Penetrating oils can look natural and feel great underfoot but generally need more frequent maintenance; wax can complicate future recoats.
- Acid-cure finishes are very durable but come with significant odor/VOC and application considerations.
- Abrasion performance is commonly benchmarked with tests such as ASTM D4060. Many modern 2K waterborne polyurethane systems rival or exceed the wear resistance of traditional oil-modified poly while maintaining lower odor and faster re-entry [1][2].
Water-Resistant, Not Waterproof
Polyurethane is water-resistant—but not waterproof. The film sheds droplets and buys you time to wipe up spills. However, seams, board ends, perimeter edges, and transitions are vulnerable to prolonged liquid dwell time. Always:
- Wipe spills promptly.
- Use entry mats and runners in splash zones (kitchens, entryways) to reduce water exposure and grit.
- Follow manufacturer cleaning and care guidance to preserve the water-resistant film without harming recoating potential [3][6].
Caution: Standing water, pet accidents left overnight, or appliance leaks can bypass the finish via joints or edges and can still damage wood. Prompt cleanup and periodic inspections are essential [6][7][8].

Water-Based vs Oil-Based Polyurethane (Plus 2K Waterborne): Which Hardwood Floor Finish Is Best?
Here’s the head-to-head comparison homeowners ask for most—by color, odor/VOC, durability and wear, and real-world timelines.

Color and Ambering Over Time
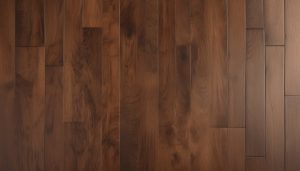
- Water-based polyurethane: Generally dries clear and stays clear, preserving the natural color of light woods like white oak and maple. It’s the go-to for a “non-amber” look [1].
- Oil-based polyurethane: Starts with an amber tone and deepens over time, which can enrich darker species like walnut and stained red oak. Expect ongoing ambering/darkening that adds warmth but shifts color noticeably on light woods [2].
Durability, Abrasion Resistance, and Film Build
- Film build and solids % influence how quickly you reach a durable wear layer. Higher-solids products build faster per coat.
- Modern 2K waterborne polyurethanes (a separate hardener is mixed in) are designed for high abrasion resistance that can match or exceed many oil-modified systems, while offering lower odor and faster return-to-service compared with traditional oil-based products.
- Manufacturers often reference standardized tests (e.g., ASTM D4060) in their literature to support abrasion performance; compare coat counts, solids %, and intended use (residential vs commercial) in the TDS to pick the right class for your needs.
Odor/VOC and Indoor Air Quality
- Waterborne finishes usually have significantly lower odor/VOC and are frequently chosen for occupied homes, condos, and fast-turn projects.
- Oil-based polyurethane has a stronger odor and typically higher VOC content; ventilation and appropriate PPE are important. Always consult the Safety Data Sheet (SDS) and follow ventilation/PPE instructions [3][4].
Dry, Recoat, and Full Cure Timelines
- Water-based polyurethane: Often recoatable in about 2–3 hours per coat under typical conditions, allowing multiple coats in a single day for quicker project turnaround [5]. Verify the precise window on the product TDS [4].
- Oil-based polyurethane: Commonly needs 24 hours or more between coats; plan on one coat per day, extending project duration [3][5].
- Full cure (maximum hardness/chemical resistance) generally takes longer than dry-to-touch. Follow the TDS for furniture move-in, heavy traffic, and area rug timing [3][4].
Sheen Selection and Scratch Camouflage
- Matte: Lowest reflectivity; excellent at hiding surface micro-scratches and daily dust but has a flat look.
- Satin: The popular middle ground—soft glow that conceals minor scratches and scuffs well, favored by families with kids and pets [3].
- Semi-gloss/Gloss: Highest reflectivity; shows dust, footprints, and scratches more readily but delivers a dramatic shine.
Do You Need a Wood Floor Sealer Before Polyurethane?
A wood floor sealer (also called a primer or sealer coat) can be essential depending on species, stain, and timeline. Its job is to control color, manage tannins, speed turnaround, and set up a reliable bond for the topcoats.
When a Sealer Is Essential (Tannin Block, Color Control, Speed)
- White oak: Use an approved tannin-blocking sealer/primer to reduce the risk of tannin bleed and discoloration—especially under waterborne poly.
- Maple and other dense/closed-grain species: A compatible sealer can help control color uniformity and adhesion.
- Reactive stains or specialty color treatments: A manufacturer-approved sealer locks color and protects against interactions with the topcoat.
- Fast-turn work: Some waterborne sealers dry fast and let you stack coats efficiently. Always confirm compatibility in the manufacturer’s system TDS.
Compatibility Matrix: Species × Stain × Sealer × Topcoat
Build your system using brand-published, approved combinations. A safe, general framework:
- White oak, natural look: Waterborne tannin-blocking sealer + 2K waterborne topcoat (satin) for high traffic.
- Maple, natural look: Clear waterborne sealer tuned for maple + waterborne topcoat to avoid unwanted ambering.
- Walnut/dark stain: Oil-modified or warm-toned waterborne systems if you want richer, ambered depth; or a clear waterborne system to hold the cooler tone.
- Exotics/reactives: Follow system charts diligently to avoid bond lines or unexpected color shifts.
Caution: Shellac or generic “sanding sealers” are not universally compatible under waterborne polyurethane. Only use combinations explicitly approved in the TDS.
Sealer Pitfalls and Fixes
- Grain raise (waterborne): Lightly abrade per TDS after the first coat; pre-wet and resand if needed for ultra-smooth results.
- Lap lines: Maintain a wet edge, work in manageable sections, and coordinate edges-to-field timing.
- Contamination/adhesion issues: Avoid oil soaps, polishes, or silicone-containing products before recoating. If adhesion is compromised, an aggressive clean, thorough abrasion, or even a resand may be required. NWFA best practices and moisture checks help ensure the substrate is ready for coating.
Choose the Right System: Decision Framework by Species, Stain, Traffic, and Timeline
Match your floor and lifestyle to a sealer + polyurethane floor coating system using criteria that pros trust.

By Wood Species and Stain Color
- White oak (natural): Choose a water-clear, non-yellowing look. Pair a tannin-blocking waterborne sealer with a 2K waterborne topcoat for durability without ambering.
- Maple: Any warmth will be more noticeable; use clear waterborne systems for a neutral tone. Follow manufacturer prep to avoid adhesion issues.
- Red oak (stained): Oil-modified poly can enrich warm stains; waterborne systems will keep tones cooler. Confirm stain + sealer + topcoat compatibility.
- Walnut: Clear waterborne preserves cooler chocolate; oil-modified adds amber richness. Decide by the target color on your sample panel.
- Exotics/reactive stains: Always build and approve samples; use system-approved sealers to lock color before topcoats.
Pro tip: Make test boards for your exact species and stain. Evaluate in room lighting for color, sheen, and scratch camouflage before committing.
By Traffic and Use: Homes with Kids, Pets, Rentals, Studios
- High wear (kitchens, entries, hallways, rentals, home studios): Favor commercial-grade 2K waterborne poly for superior abrasion resistance and fast re-entry.
- Standard residential (living, bedrooms): High-quality 1K waterborne or oil-modified can work; choose sheen for scratch hiding (often satin).
- Pet-heavy households: Satin sheen, adequate film build (3–4 total coats in waterborne systems), and strict mat/pad placement.
By Odor/VOC and Timeline Tolerance
- Need fast turnaround/low odor: Waterborne systems let you apply multiple coats/day with reduced odor, minimizing downtime [5]. Ideal for occupied homes, condos, and schedules with kids/pets.
- Extended timeline is acceptable: Oil-based systems deliver a warm, classic look but plan for 24+ hours between coats and stronger odor [3][5].
Lifecycle Cost Model: 10-Year Outlook
Think beyond day one:
- Initial system: Product cost + labor/time (DIY or pro).
- Maintenance: Screen-and-recoat every few years in traffic lanes to avoid a full resand.
- High-wear zones: Upgrading to 2K waterborne can reduce wear, lengthen recoat intervals, and lower total cost over the decade.
Benchmark: Professional hardwood refinishing typically runs $3–$8 per square foot with a national average around $1,800, and staining often adds $1–$3 per square foot [9]. Use these ranges to model the 10-year total with and without periodic recoats.
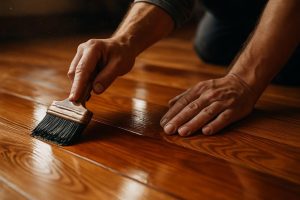
How to Apply Polyurethane to Wood Floors: A Pro-Grade Step-by-Step
Follow this blueprint to avoid bubbles, lap lines, and adhesion issues—and to get predictable, durable results.
Room Prep and Sanding Sequence
- Clear the room; mask and seal openings. Optimize ventilation per SDS.
- Sanding: Progress through appropriate grits (for a full refinish, follow a professional sequence), finishing at a fine grit that the product TDS supports for optimal bonding. Edges and field should blend uniformly.
- Dust control: Vacuum thoroughly and tack per TDS. Avoid household dust, HVAC drafts, and open windows that invite debris [4].
Stir, Don’t Shake: Product Prep
- Gently stir polyurethane; do not shake—shaking entrains bubbles that can mar the film [3].
- Strain the finish if the TDS advises it to remove any impurities.
- For 2K waterborne: Mix base and hardener exactly as directed and observe pot life (working time) noted in the TDS.
Choose the Right Applicator: T-Bar, Roller, or Pad
- T-Bar/applicator pad: Pro favorites for large, open areas, offering even film build and efficient coverage.
- Roller (floor-rated, microfiber or mohair): Convenient for DIYers; select the nap recommended by the product TDS to control film thickness.
- Brush/trim pad: Use for edges and cut-ins, then blend into the field. The Spruce recommends floor-rated applicators and a consistent application pattern for even coverage [4].
- Coverage planning: Calculate square footage × number of coats ÷ product coverage rate to estimate gallons needed [3].
Edges and Field Technique: Avoiding Lap Lines and Bubbles
- Work in sequence: Cut in edges, then immediately pull the field coat to meet the wet edge and avoid lap marks.
- Maintain a wet edge: Plan exit points; work with room lighting that helps you see “wet” vs “dry.”
- Bubble control: Stir (never shake), avoid over-rolling, and keep applicator pressure light and consistent. If bubbles appear, pause and diagnose—heat, airflow, or overworking can be culprits.

Coat Counts, Intercoat Abrasion, and Recoat Windows
- Typical systems:
- Waterborne: 1 sealer + 2–3 topcoats (3–4 total coats).
- Oil-based: Usually 3 coats.
- Intercoat abrasion: Many systems require a light screen between coats (often 180–220 grit) to remove nibs and ensure adhesion; follow the TDS [3].
- Observe recoat windows precisely. If you miss the window, additional abrasion or a bonding step may be required [4].
Dry, Re-Entry, and Full Cure Timeline
- Water-based polyurethane: Recoat in about 2–3 hours (conditions permitting); light foot traffic often within 24 hours; furniture after several days; rugs typically after 7–14 days—confirm your product’s TDS [4][5].
- Oil-based polyurethane: Often 24+ hours between coats; plan re-entry and furniture/rug timing conservatively per TDS [3][5].
Troubleshooting: Bubbles, Dust Nibs, Lap Lines, and Adhesion
- Bubbles: Let the coat level if minor; for persistent bubbles, allow to dry, then screen and recoat with corrected technique (stirred product, gentler application, less airflow).
- Dust nibs: Lightly abrade with the TDS-recommended grit, vacuum, and tack before recoating.
- Lap lines: Improve edges/field timing; reduce overlaps; work smaller sections.
- Adhesion issues: Suspect surface contamination or missed recoat window. Perform a thorough clean and abrasion or resand if widespread. NWFA-aligned moisture checks can confirm substrate readiness.
Maximize Water Resistance and Day-to-Day Care
Coat Counts and Sealer Choices for Better Resistance
- A proper system (approved sealer + topcoats) and adequate film build improve water resistance and stain holdout. More film does not make the floor waterproof, but it can buy you more cleanup time before liquids penetrate seams.
Spill Response and Edge Vulnerabilities
- Wipe spills immediately.
- Watch board ends, perimeters, and transitions—prolonged moisture at these points can enter the wood even with a topcoat in place.
- Appliance and plant areas: Add trays or mats and inspect periodically [6][7][8].
Cleaning, Mats, and Felt Pads
- Cleaning: Use manufacturer-approved, neutral pH hardwood floor cleaners; avoid oil soaps, waxes, and silicone polishes that can impair recoating.
- Mats: Place quality entry mats at all exterior doors and runners in high-traffic lanes.
- Furniture pads: Install felt pads under chairs, tables, and accent pieces to reduce abrasion. Bona’s homeowner guidance offers helpful prevention tips [6].
Screen-and-Recoat Cadence (Before Bare Wood Shows)
- Inspect traffic lanes for sheen loss and micro-scratching. A timely screen-and-recoat refreshes the wear layer before bare wood exposure forces a full resand.
- High-wear homes (kids, pets) may benefit from more frequent recoats on lanes and entries; lower-traffic areas can go longer. Align with NWFA maintenance and recoat guidance.
Solve Common Problems: Scratches, Traffic-Lane Wear, and Water Damage
Scratches and Scuffs: Quick Fixes vs Recoat
- Scuffs and finish-only micro-scratches: Often removable with approved cleaners or light polishing pads.
- Light scratches into the finish: A screen-and-recoat can restore uniform sheen and protection across the room.
- Deep gouges into wood: Spot repairs may be visible; full resand and refinish delivers the best uniform outcome. Use manufacturer-approved touch-up solutions when appropriate and keep the floor recoatable by avoiding contaminating products [6].
Finish Wear in High-Traffic Areas
- Symptoms: Sheen loss, a “gray” cast, and eventually grain exposure in lanes.
- Prevention: Entry mats, strict felt-pad use, routine dusting, and periodic damp cleaning with neutral pH products.
- Upgrade path: Consider a commercial-grade 2K waterborne polyurethane system in kitchens, hallways, entries, and rentals for higher abrasion resistance and quicker maintenance cycles.
Water Damage Triage: Cupping, Crowning, and Buckling
- Act fast: Stop the source, extract standing water, deploy dehumidification and airflow, and begin monitoring moisture content.
- Watch for: Cupping (edges curl up), crowning (center rises), and buckling (severe uplift). Document moisture readings and changes over 24–72 hours to inform salvage vs replace decisions.
- Guidance: Restoration steps and decision-making frameworks from RW Supply + Design and Jenkins Restorations explain when drying, monitoring, or replacement is appropriate [7][8]. NWFA moisture guidelines help determine when it’s safe to refinish after an event.
Best Polyurethane for Hardwood Floors: Brand‑Neutral Criteria and Use‑Case Picks
Selection Criteria: What Really Matters
- Abrasion performance: Look for products with strong wear data; many 2K waterborne options lead this category.
- Solids % and film build: Higher solids can reduce the number of coats needed to reach a target film thickness.
- Recoat/cure windows: Faster recoat allows multiple coats per day; quicker cure shortens disruption.
- Odor/VOC: Waterborne systems minimize odor and are typically easier to live with during projects.
- Repairability and maintenance: Ensure the system supports future screen-and-recoat without stripping.
Use‑Case Recommendations: Light vs Dark Woods, High‑Traffic, Low‑Odor Needs
- Preserve light, natural color (white oak, maple): Water-clear, low-yellowing waterborne polyurethane; satin sheen; 1 sealer + 2–3 topcoats.
- Enrich dark woods/stains (walnut, deep-toned red oak): Oil-modified poly for warmth—or a warm-toned waterborne system if you need lower odor/faster re-entry.
- Maximum durability and speed (rentals, kitchens, entries): 2K waterborne polyurethane; satin sheen for scratch camouflage; strict maintenance program [3][4][5].
Sheen and Scratch Hiding: Why Satin Wins for Families
Satin blends beauty and practicality by softening reflections that highlight micro-scratches, footprints, and everyday dust. It’s commonly recommended for busy homes with kids and pets [3].
DIY vs Professional Polyurethane Floor Refinishing
Costs and What’s Included
- National benchmarks: Expect roughly $3–$8 per square foot for professional refinishing; average projects around $1,800. Staining commonly adds $1–$3 per square foot depending on scope and method [9].
- Typical pro scope: Dust containment, sanding, optional staining, sealer, 2–3 polyurethane topcoats, and final cleanup. Confirm the exact product system and coat counts in writing.
Project Timelines and Re-Entry
- Waterborne systems: Multiple coats per day are often possible, reducing total project days and household disruption [5]. Re-entry timelines for light traffic and furniture depend on the TDS [4].
- Oil-based systems: Typically one coat per day and longer odor dissipation and cure timelines [3][5].
- Household planning: Children, pets, and sensitive individuals may require temporary relocation regardless of finish choice—plan with your contractor.
How to Choose a Reputable Refinishing Contractor
Use this vetting checklist:
- Credentials: Licenses where applicable, liability insurance, and worker’s comp.
- References and portfolio: Ask for similar-scope projects and product names used.
- Dust control: What equipment and containment do they use?
- Product specs: Require brand-neutral, TDS-backed system specifications (sealer + topcoat, sheen, coat counts).
- Recoat plan: Maintenance recommendations and warranty in writing.
When DIY Is Not Advisable
Hire a pro when:
- There’s severe water damage, cupping/crowning/buckling, or subfloor moisture issues.
- Adhesion failures are widespread, or contamination must be remediated.
- The project includes staircases, border/inlay work, herringbone/chevron, or complex layouts.
- Timelines are tight and re-entry must be precisely scheduled.
FAQs About Polyurethane Floor Coatings
What is a polyurethane floor coating and how does it protect wood?
It’s a film-forming hardwood floor finish that seals pores and builds a durable wear layer to resist abrasion and everyday spills. It’s water-resistant, not waterproof; prompt spill cleanup is still essential [6].
What’s the difference between water-based and oil-based polyurethane?
Water-based typically stays clear and has lower odor with faster recoats; oil-based ambers and darkens over time and often needs 24+ hours between coats. Both can be durable; many 2K waterborne products match or surpass oil-modified abrasion resistance. Always follow the product TDS for timing and technique [1][2][3][5].
How many coats of polyurethane are best for floors?
Common guidance: waterborne systems total 3–4 coats (often 1 sealer + 2–3 topcoats); oil-based systems are typically 3 coats. Intercoat abrasion requirements vary—check your TDS [3][4].
How long does polyurethane last on hardwood floors?
With proper cleaning and timely screen-and-recoat before bare wood shows, polyurethane floors can perform for many years. Longevity depends on traffic, product class (e.g., commercial-grade waterborne vs residential), and maintenance cadence aligned with NWFA best practices.
Can I apply polyurethane over an existing finish without sanding?
Generally, no. A mechanical abrasion (screening) is required for adhesion, and you must follow the recoating protocol in the product TDS. Avoid contaminating cleaners/polishes beforehand [3][4].
Is water-based polyurethane as durable as oil-based?
Modern 2K waterborne systems can match or exceed the abrasion resistance of many oil-modified products, while offering lower odor and faster re-entry. Durability also depends on total film build, maintenance, and timely recoats [1][5].
Are water-based finishes water-resistant enough for kitchens?
Yes—when applied as a proper system and maintained. Use mats in splash zones, wipe spills promptly, and follow the manufacturer’s cleaning guidance. Remember: water-resistant ≠ waterproof [6].
Tools, Calculators, and Downloads
Coverage and Coat Calculator
- Inputs: Room square footage, desired number of coats, and product coverage rate from the TDS.
- Outputs: Total gallons needed and a day-by-day application plan based on recoat windows.
- Tip: Log ambient temperature and relative humidity; they influence dry and recoat timing [3][4].
Cure/Re-Entry Schedule Planner
- Build a timeline for coats/day, light foot traffic, furniture move-in, and rug placement for your exact product and conditions.
- Use waterborne systems to compress total project days when low odor and fast re-entry matter [4][5].
Maintenance Checklist
- Daily/weekly: Dust mop or vacuum with a hardwood setting; damp clean with neutral pH cleaner as needed.
- Monthly/quarterly: Check traffic lanes; refresh felt pads; launder entry mats.
- Annually/as needed: Plan a screen-and-recoat before bare wood appears on lanes.
- Avoid: Oil soaps, waxes, silicone polishes, and harsh chemicals that impair recoating [6].
Conclusion
When matched thoughtfully to your species, stain, traffic, and timeline, polyurethane remains the most versatile, water-resistant, and maintainable hardwood floor finish. Use this NWFA-aligned framework to choose the right sealer + topcoat system, apply it with a pro-grade process, and maintain it with simple, reliable routines. Ready to plan? Run your coverage and cure schedule, finalize sheen and coat counts, and print the maintenance checklist. Complex or time-sensitive project? Request written estimates from certified pros and specify the exact product system and scope so everyone is aligned from day one.
Disclaimer
Always follow the specific product’s TDS/SDS for application, PPE, ventilation, and recoat/cure windows. Polyurethane is water-resistant, not waterproof—promptly clean spills. Test compatibility on an inconspicuous area before full application. Comply with local VOC regulations.
References
- The Spruce Staff. (N.D.). Water-Based Polyurethane for Wood Finishes: Advantages and How to Use It. The Spruce. Retrieved from https://www.thespruce.com/water-based-polyurethane-wood-finishes-5101497
- New England Floor Sanding. (N.D.). Water Base vs Oil-Based Finish. Retrieved from https://www.newenglandfloorsanding.com/water-base-vs-oil-based-finish/
- The Home Depot Staff. (N.D.). How to Apply Polyurethane. The Home Depot. Retrieved from https://www.homedepot.com/c/ah/how-to-apply-polyurethane/9ba683603be9fa5395fab901d96f5888
- The Spruce Staff. (N.D.). How to Apply Polyurethane for Floors. The Spruce. Retrieved from https://www.thespruce.com/how-to-apply-polyurethane-for-floors-5185503
- Fisher, K. (2021). Oil Based vs Water Based Polyurethane – Which is Better? [Video]. YouTube. Retrieved from https://www.youtube.com/watch?v=4fO1xaGbYRw
- Bona. (N.D.). Preventing Scratches on Hardwood Floors. Retrieved from https://www.bona.com/en-us/homeowner/how-to/preventing-scratches-on-hardwood-floors/
- RW Supply + Design. (N.D.). Can You Save Water-Damaged Wood Flooring After a Leak or Flood? Retrieved from https://resources.rwsupply.com/guide/water-damaged-floors-guide-can-you-save-water-damaged-wood-flooring-after-a-leak-or-flood/
- Jenkins Restorations. (N.D.). How to Minimize and Repair Water Damage to Wood Floors. Retrieved from https://jenkinsrestorations.com/how-to-minimize-and-repair-water-damage-to-wood-floors/
- This Old House Editors. (2023). Cost to Refinish Hardwood Floors. This Old House. Retrieved from https://www.thisoldhouse.com/flooring/cost-to-refinish-hardwood-floors